---
updatedAt: 2025-11-13T22:59:18.000Z
agentTools:
  projectIndex: https://docs.botsonic.com/llms.txt
---

# How to Customize the APPEARANCE of Your Chatbot

Learn how to personalize or add branding to the look and appearance of your chatbot

# Step 1 - Access the Bot's Appearance Settings

1. Navigate to your Botsonic Dashboard by clicking on \[Home] from the left hand side menu. Then click and open the Bot you want to connect. *If you haven't created a Bot yet, read this[Quick Start Guide](https://docs.botsonic.com/docs/quick-start)*

   <Image align="center" className="border" border={true} src="https://files.readme.io/56385ad-Your_Bots.png" />

<HTMLBlock>{`
<br>
`}</HTMLBlock>

2. Click \[Appearance] from the left hand side menu

   <Image align="center" className="border" border={true} src="https://files.readme.io/c3a5f2f-image.png" />

   <br />

## Preview the look of your chatbot

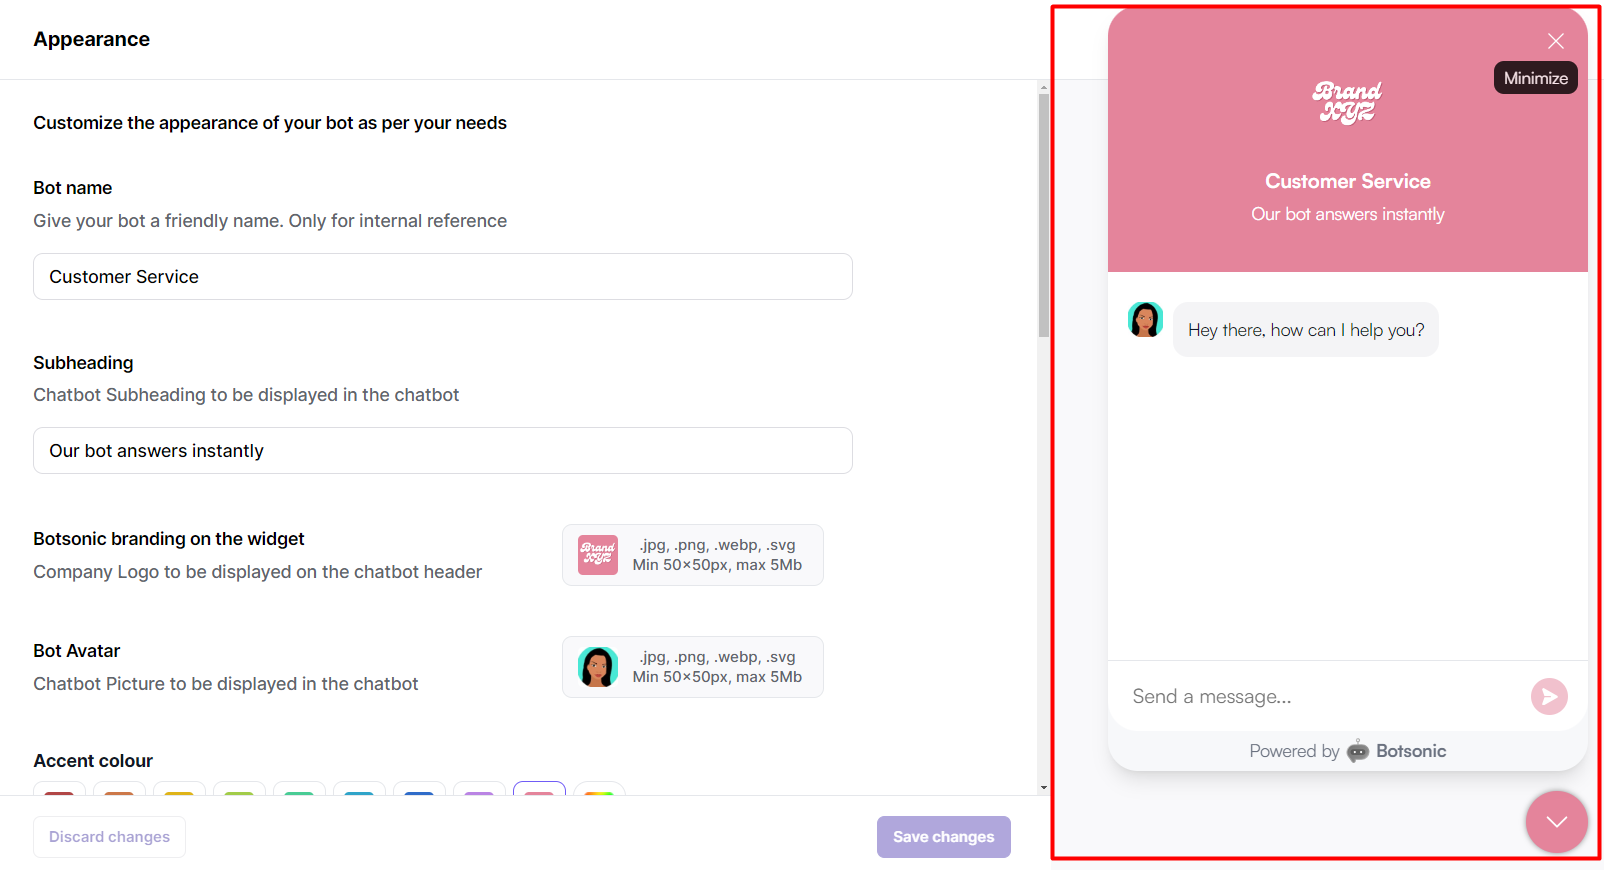
> 📘 You can preview the look of your chatbot in real time as you make changes
>
> The preview pane is located on the right-hand side of the page.
>
> ![](https://files.readme.io/23a088b-image.png)
<br />

<br />

# Step 2 - Personalize the look and feel of the chatbot

## Company Name

Enter your company name or any name you'd like to appear on the Bot's interface.

<Image align="center" className="border" border={true} src="https://files.readme.io/83b2771-image.png" />

<br />

## Subheading

Enter a customized message for your bot's subheading

<Image align="center" className="border" border={true} src="https://files.readme.io/bdbfa94-image.png" />

<br />

## Company Logo

Upload your company logo

<Image align="center" className="border" border={true} src="https://files.readme.io/b559435-image.png" />

<br />

## Bot Avatar

Upload an avatar for your bot

<Image align="center" className="border" border={true} src="https://files.readme.io/9d76e00-image.png" />

<HTMLBlock>{`
<br>
`}</HTMLBlock>

## Accent Color

Select an accent color

<Image align="center" className="border" border={true} src="https://files.readme.io/baa02fe-image.png" />

<br />

You can also select an accent color from the color picker or enter a hex code

<Image align="center" className="border" width="60% " border={true} src="https://files.readme.io/a8b6acc-image.png" />

<br />

## Widget icon

Select an icon for the chat widget

<Image align="center" className="border" border={true} src="https://files.readme.io/529da41-image.png" />

<br />

## Widget Position

Select left or right for the widget position on your website's screen

<Image align="center" className="border" width="60% " border={true} src="https://files.readme.io/e48ce9e-image.png" />

<HTMLBlock>{`
<br>
`}</HTMLBlock>

## Input Placeholder

Enter a message to be displayed as an input placeholder on the chatbot

<Image align="center" className="border" border={true} src="https://files.readme.io/f7dbdf4-image.png" />

<br />

## Weclome Message

* Enter a customized welcome message that will be displayed to users when they start engaging with the Bot
* Toggle OFF to disable

<Image align="center" className="border" border={true} src="https://files.readme.io/9b87f15-image.png" />

<br />

## Show/hide Botsonic's branding

<Image align="center" className="border" border={true} src="https://files.readme.io/1f496ba-image.png" />

<br />

<Callout icon="👉" theme="default">
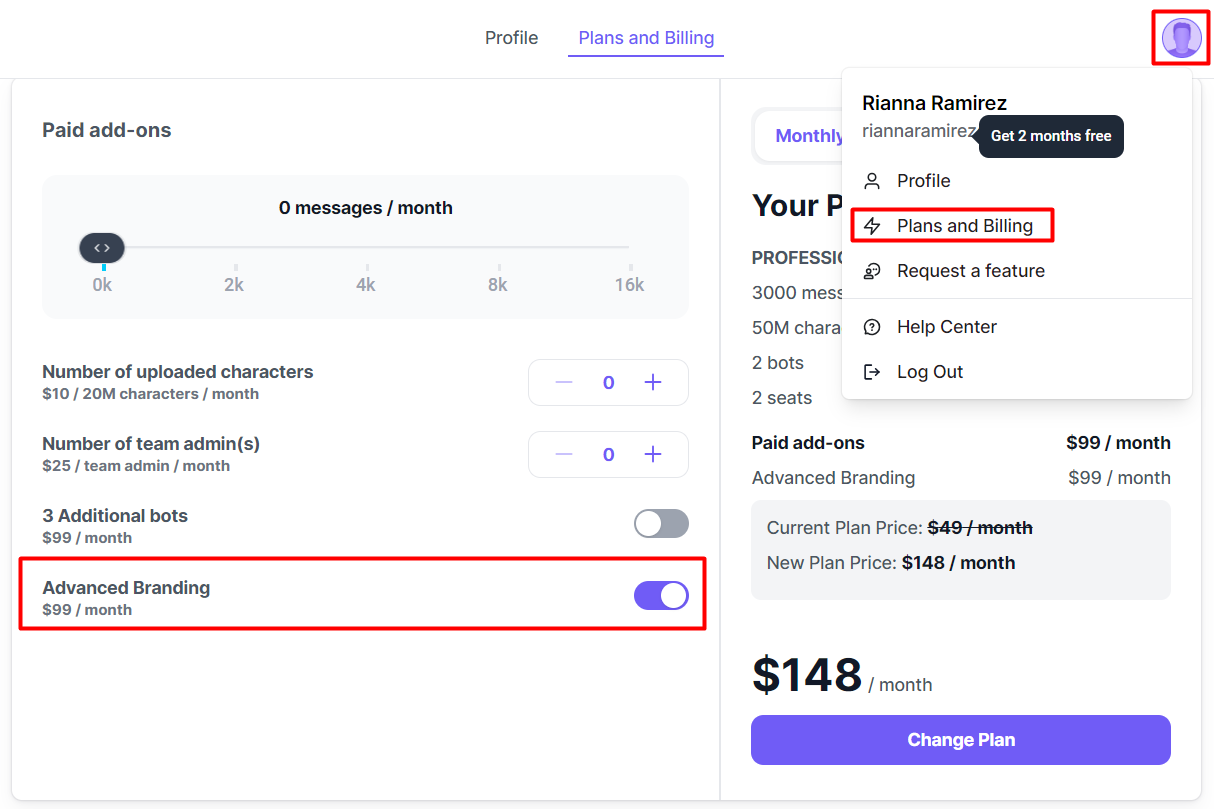
  ### Hiding Botsonic's branding is an add-on

  To activate, please go to your [Plans and Billing](https://docs.botsonic.com/docs/plans-and-billing) page to switch ON this add-on.
  ![](https://files.readme.io/09bfbfc-image.png)
</Callout>

<HTMLBlock>{`
<br>
`}</HTMLBlock>

## Widget is Open by Default

Select a setting to open/close the widget by default

<Image align="center" className="border" border={true} src="https://files.readme.io/e8b26b5-image.png" />

<br />

<br />

# Step 3 - Save your changes

Click \[Save changes]

<Image align="center" className="border" width="70% " border={true} src="https://files.readme.io/129d4b0-image.png" />